常用控件5
分裂器
分裂器 QSplitter 可以用来存放多个子控件, 相邻子控件之间边缘可以拖动边界的位置。
如下代码所示
from PySide2 import  QtGui, QtWidgets
from PySide2.QtCore import Qt

class Window(QtWidgets.QWidget):

    def __init__(self):

        super().__init__()

        # 创建一个分裂器,
        # 参数 Qt.Vertical 是垂直分裂, Qt.Horizontal是水平分裂
        splitter = QtWidgets.QSplitter(Qt.Vertical)

        # 通过insertWidget添加子控件,
        # 第一个参数是子控件插入的位置
        splitter.insertWidget(0, QtWidgets.QListWidget())
        splitter.insertWidget(1, QtWidgets.QTableWidget(0,2,self))
        splitter.insertWidget(2, QtWidgets.QTextEdit())

        # layout
        self.layout = QtWidgets.QVBoxLayout(self)
        self.layout.addWidget(splitter)
        self.setLayout(self.layout)


app = QtWidgets.QApplication()

window = Window()
window.resize(500, 500)

window.show()
app.exec_()
参考官方文档这里 ,分裂器 分裂窗口的 初始比例 可以通过如下方法设置
#  设置每个部分的宽度,单位是像素

splitter.setSizes([100, 300, 300])
主窗口
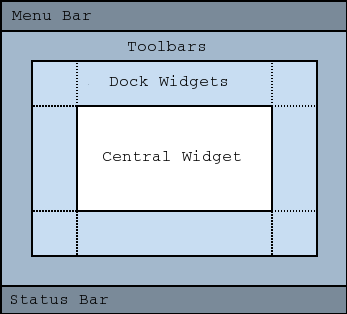
Qt 的 主窗口 QMainWindow 是一种特殊的 QtWidget
如下图所示:

它可以包含有 菜单栏(QMenuBar)、工具栏( QToolBar)、可停靠窗(QDockWidget)、中央控件、状态栏(QStatusBar )
其中,中央控件可以是任意类型的 QtWidget
下面的代码是一个示例
from PySide2 import QtWidgets

class MyWindow(QtWidgets.QMainWindow):
    def __init__(self):
        super().__init__()

        # 工具栏
        toolbar = QtWidgets.QToolBar(self)
        self.addToolBar(toolbar)

        # 工具栏按钮
        action_addOne = QtWidgets.QAction("添加", self)
        action_addOne.setStatusTip("添加一个设备")

        action_delOne = QtWidgets.QAction("删除", self)
        action_delOne.setStatusTip("删除一个设备")

        toolbar.addAction(action_addOne)
        toolbar.addAction(action_delOne)

        # CentralWidget 和 CentralWidget layout
        centralWidget = QtWidgets.QWidget()
        self.layout = QtWidgets.QVBoxLayout(self)
        self.layout.addWidget(QtWidgets.QTextEdit())
        centralWidget.setLayout(self.layout)

        self.setCentralWidget(centralWidget)

        # 状态栏
        statusBar = QtWidgets.QStatusBar(self)
        self.setStatusBar(statusBar)
        statusBar.showMessage(f'这是状态栏')

app = QtWidgets.QApplication()

window = MyWindow()
window.resize(700, 700)

window.show()
app.exec_()
图标
图标库 qtawesome
一套美观的图标可以让程序赏心悦目。
我们可以根据自己一个个的去找图标图片。
这里推荐 Python Qt 的第三方图标库 c
这个库里面囊括了几套免费的图标库,比如 FontAwesome、Elusive Icons、Material Design Icons、 Phosphor、 Remix Icon 、 Codicons
可以执行命令 pip install qtawesome 进行安装
安装好以后,可以执行命令 qta-browser 查看有哪些合适的图标
选中你要用的图标名称,点击下发的按钮 Copy Name 可以拷贝该图标的名字到剪贴板。
然后程序中如何使用呢?
在 Python Qt 中任何使用 Qt 图标(QIcon)对象 的地方都可以使用,
# 导入qtawesome库
import qtawesome as qta

# qta.icon()返回值就是 QIcon 对象
icon = qta.icon('fa5.flag')
比如
from PySide2 import QtWidgets
# 导入qtawesome库
import qtawesome as qta

class MyWindow(QtWidgets.QMainWindow):
    def __init__(self):
        super().__init__()

        # 工具栏
        toolbar = QtWidgets.QToolBar(self)
        self.addToolBar(toolbar)

        # 工具栏按钮
        action_addOne = QtWidgets.QAction("添加", self)
        action_addOne.setIcon(qta.icon(
            'ph.plus-circle-light',  # 图标名称
            color='teal',            # 图标正常颜色
            color_active='orange',   # 图标活跃状态颜色
            scale_factor=1.0         # 图标大小比例
        ))

        action_delOne = QtWidgets.QAction("删除", self)
        action_delOne.setIcon(qta.icon(
            'ph.minus-circle-light',  # 图标名称
            color='teal',             # 图标正常颜色
            color_active='orange',    # 图标活跃状态颜色
            scale_factor=1.0          # 图标大小比例
        ))

        toolbar.addAction(action_addOne)
        toolbar.addAction(action_delOne)

app = QtWidgets.QApplication()

window = MyWindow()
window.resize(700, 700)

window.show()
app.exec_()